
Last updated: August 26, 2026
You can create a QR code for Google Forms by opening the responder link in Chrome and using Chrome's page-sharing feature. Google Forms itself does not generate the QR code.
The URL matters more than the image. Publish the form first, copy the link intended for responders, and confirm that the access settings match the people who will scan it. Then create the QR code and test the printed copy with another phone.
This guide covers the complete path on a computer, Android, and iPhone or iPad. You can follow every step without relying on a screenshot.
The short answer
The workflow has four parts.
1. Publish the Google Form.
2. Copy the responder link, not the editing URL.
3. Open that link in Chrome and create the QR code.
4. Scan a printed test with another phone and verify the form.
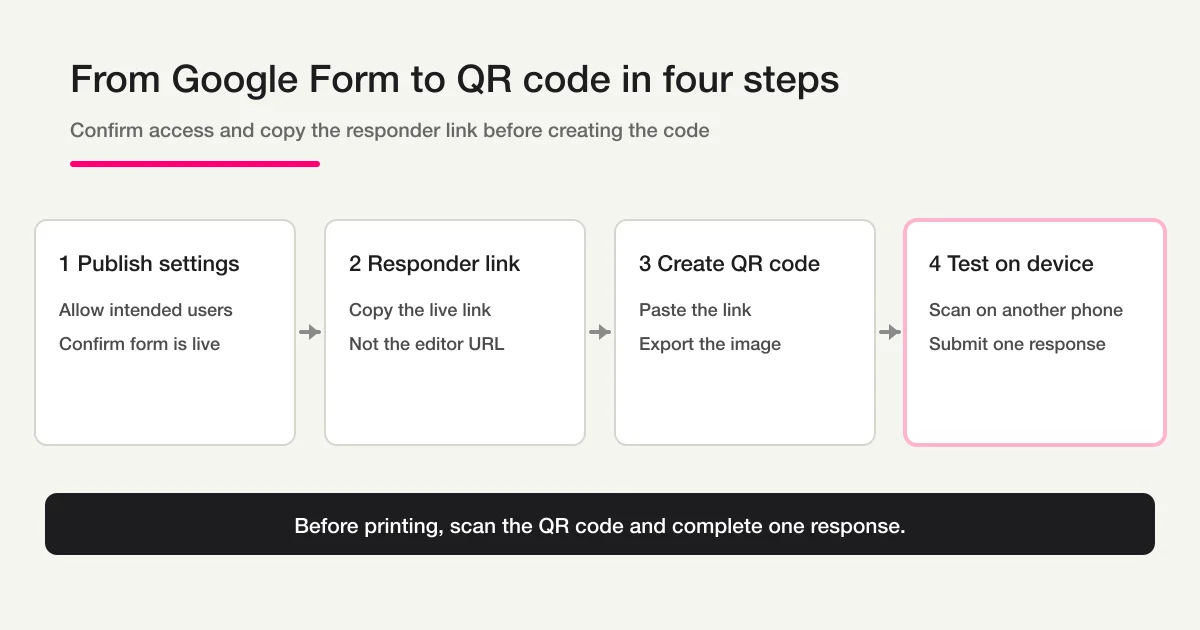
A QR code only stores the destination URL. It does not change the form's publishing state or grant access. A perfectly clear QR image still fails for responders when the underlying form is unpublished or limited to the wrong audience.
Step 1 Publish the Google Form and check responder access
Open the form in the Google Forms editor. Review the settings before you create any image.
1. Open Settings at the top of the form.
2. Review response limits, email collection, and response editing.
3. Select Publish in the top-right corner.
4. Select Manage and review who can respond.
5. If the form is public-facing, set General access to anyone with the link when appropriate.
6. Select Publish.
7. Confirm that Published appears in the top-right corner.
Google's official documentation says responders need the form to be published before they can access it. If the owner later unpublishes the form, people with the QR code will no longer be able to open the response page.
The right access setting depends on the use case. A QR code on an internal office poster may be intentionally limited to a Workspace domain or a named group. A QR code on a public flyer usually needs to work outside the owner's organization.
There is another sign-in decision to check. When Limit to 1 response is enabled, responders must sign in to a Google Account. That can be appropriate for a controlled internal survey. It can also create unexpected friction at a public event. Decide before printing whether sign-in is a requirement or an accidental barrier.
Step 2 Copy the responder link
Do not copy the URL from the editor's address bar. The QR code should contain the link Google labels for responders.
Google documents three ways to obtain it:
Option A: Preview > Copy responder link
Option B: Published > Copy responder link
Option C: Share > Copy responder link
After the form is published, Google Forms can also provide a shortened URL. Either the normal responder link or the shortened version can be encoded. Keep a small record beside the downloaded image that identifies the form and the date you tested it. A folder full of unnamed QR images is difficult to audit later.
Before creating the QR code, paste the responder link into a private or incognito window where you are not signed in as the owner. Confirm that the correct form title and first question appear. If the intended audience is restricted, test with an account that actually belongs to that audience.
This one check catches the most expensive mistakes before design and printing begin:
- an editor URL was copied
- the wrong form was selected
- the form is still unpublished
- the form requires an account the audience does not have
- a Workspace domain or group restriction is still active
Step 3 Create the QR code in Chrome
Create it in Chrome on a computer
On a computer, create the code from the live responder page.
1. Open Chrome.
2. Paste the responder link into the address bar.
3. Confirm that the responder-facing form is open.
4. Select More in the top-right corner.
5. Select Cast, save, and share.
6. Select Create QR code.
7. Select Download to save the QR image.
Chrome generates the QR code for the page that is currently open. If the editor page is still open when you choose Create QR code, the image may point to the wrong destination. Look at the page content before downloading, not only at the browser tab title.
Keep the downloaded image square. Do not stretch one side to make it fit a narrow layout. Do not crop the white area around the code, place text over it, or add a logo in the center. Those changes can make the code harder to detect.
Create it in Chrome on Android
Chrome on Android has a QR option in the page-sharing menu.
1. Open the responder link in Chrome on an Android phone or tablet.
2. Confirm that the form response page is visible.
3. Tap More beside the toolbar.
4. Tap Share.
5. Select QR code.
6. Follow the on-screen steps to download or share the code.
If QR code does not appear in the sharing menu, update Chrome and reopen the responder page. Menu order can vary by device maker and Chrome version, so focus on the Share action rather than a fixed screen position.
The same URL rule applies on mobile. Opening the Forms editor in a mobile browser and generating a code from that page is not a substitute for copying the responder link.
Create it in Chrome on iPhone or iPad
Chrome for iPhone and iPad uses the share button.
1. Open the responder link in Chrome on the iPhone or iPad.
2. Confirm that the response page is visible.
3. Tap Share at the top.
4. Tap Create a QR Code.
5. Tap Share below the QR code.
6. Send the image into the print or design workflow you use.
The final destinations in the iOS share sheet depend on the operating-system version and installed apps. The important part is that Chrome created the code from the responder page. You can test the displayed code with another device before deciding where to store it.
Step 4 Print and verify the QR code on a real device
A code that scans on a bright screen can fail after it is reduced, compressed, placed over a pattern, or printed on reflective material.
Start with one proof at the actual intended size. Do not approve a poster from the design file alone.
Use this checklist:
[ ] The code has clear white space on all four sides.
[ ] The image remains square and has not been stretched.
[ ] Dark modules and the light background have strong contrast.
[ ] No text, frame, logo, or background pattern touches the code.
[ ] The code is away from a fold, crop line, or highly reflective area.
[ ] A second phone can scan the printed proof.
[ ] The form opens for the intended audience without the owner's session.
[ ] The title and first question are correct.
[ ] When appropriate, one test submission reaches the Responses tab.
DENSO WAVE, the developer of the QR Code, documents a required margin around the symbol. It calls this blank region the margin or quiet zone and specifies at least four cells on the top, bottom, left, and right. A cell is one small square that makes up the code.
That requirement is easy to break in a flyer template. A designer may crop the image close to the dark modules or place a colored label directly against it. Keep the quiet zone visually empty.
Do not use one universal physical size for every print job. Viewing distance, URL length, print resolution, paper, lighting, and camera quality all affect the result. The reliable rule is to print at the final size and test the physical item under realistic conditions.
Why a Google Forms QR code does not work
First separate two failures:
- The camera does not recognize the QR code.
- The camera recognizes it, but the Google Form does not open correctly.
They have different causes.
| Symptom | Likely cause | What to check |
|---|---|---|
| The camera shows no link | The code is too small, blurred, cropped, reflective, or missing quiet space | Compare the source image and printed proof; restore the margin and size |
| The wrong page opens | The editor page or another form was encoded | Copy the responder link again from Preview, Published, or Share |
| A permission page appears | The form is unpublished, domain-restricted, group-restricted, or unavailable to that account | Review Published and responder access |
| Google sign-in appears | One-response limits or organization policy require an account | Check whether that requirement matches the audience |
| The code worked before but fails now | The form was unpublished, deleted, or had its access changed | Open the current responder link in a separate browser |
| The screen version scans but paper does not | Printing reduced resolution, size, contrast, or quiet space | Re-export and test at the final printed size |
If the URL opens and then shows an access error, the QR scan succeeded. Fix the Google Forms permission rather than redesigning the QR image.
If the camera does not recognize anything, start with the physical code. Restore white space, remove nearby decoration, increase the printed size, and test in steady light without glare.
Manage the QR image with its responder link
A folder of QR images becomes difficult to trust when the files do not identify their destinations. Give the downloaded image a name that includes the form purpose and the date it was approved, such as seminar-entry-qr-20260826.png.
Keep a lightweight record beside the file:
Form name
Responder link
QR image filename
Responder access setting
Last physical scan date
Person who verified it
Printed materials using the image
This record answers a practical question months later: can the team reuse the image, or does it need to create and approve a new one?
Editing a question or description does not normally require a new QR image when the responder URL remains the same. Replacing the form with a copy, switching to a pre-filled link, or changing the destination does require a new image. A publication or permission change may leave the URL unchanged, but it still requires another access test because the responder experience has changed.
For a small team, separate creation from approval when possible. The owner is often signed in to the account that created the form and may pass an access check that an ordinary responder cannot. Ask a second person to use the same kind of account as the audience, or an unsigned device for a public form.
Record the date that person scanned the physical proof, the form title that opened, and whether a test submission arrived. This takes less than a minute and gives the team a clear approval point before a reprint. It also prevents an old QR file from being reused after the form has been replaced or restricted.
A practical testing sequence before distribution
For a public poster, event handout, menu, classroom sheet, or application form, use a repeatable approval sequence.
1. The form owner publishes the final version.
2. The owner copies the responder link from Google Forms.
3. A QR image is created from that responder page.
4. The designer places the unchanged square image into the layout.
5. One proof is printed at the final size.
6. A person other than the owner scans it on another phone.
7. The tester confirms title, first question, sign-in behavior, and submission.
8. Only then is the full print run approved.
The second person is important. The owner may be signed in to the Google Account that created the form and can accidentally pass an access check that ordinary responders fail.
For an internal form, the tester should use the same type of managed account as the audience. For a public form, include an unsigned test or an account outside the owner's organization.
If the form must change after printing, remember that the QR code only points to the URL. Editing questions under the same responder link usually does not require a new image, but changing publication or access can still break the experience. Re-run the access and submission checks after any meaningful change.
Create a QR PNG for a published FORMLOVA form in chat
The Google Forms method above uses Chrome to turn a page URL into a QR code.
For a published FORMLOVA form, FORMLOVA can generate the PNG in chat. It will not generate a QR code for an unpublished form. The implemented input accepts an image size from 100 to 1,000 pixels and a margin from 0 to 10.
For a printed asset, you can request a four-cell margin and a 600-pixel image:
Create a QR code for this form with margin 4 at 600px.
The response includes the form title, public URL, size, and PNG image.
QR code generated - Event registration form

URL: https://formlova.com/...
Size: 600px
The command removes the need to find a separate QR generator, but it does not remove the print test. Scan the PNG from a second device, then scan the printed proof at its final size.
FAQ
Does Google Forms have a built-in QR-code generator?
Google Forms provides the responder link. Chrome provides the Create QR code action for the open page. The QR-generation step is a Chrome page-sharing feature, not a Google Forms feature.
Which Google Forms URL should the QR code contain?
Use the responder link copied from Preview, Published, or Share. Do not encode the editor URL from the address bar. Test the copied link without the owner's signed-in session before creating the image.
Can I create the Google Forms QR code on a phone?
Yes. On Android Chrome, open Share and select QR code. On iPhone or iPad Chrome, tap Share and then Create a QR Code.
Why does the QR code ask responders to sign in to Google?
The form may limit people to one response, restrict access to an organization or group, or be subject to a Workspace policy. The QR image does not bypass those settings. Review responder access and the response settings.
How much blank space does a QR code need?
DENSO WAVE specifies at least four cells of blank margin on every side. Keep text, borders, patterns, and crop lines outside that quiet zone, then test the printed proof.
Do I need a new QR code when I edit the form?
Not when the responder URL stays the same. However, re-test after changing publication, access, sign-in requirements, or the expected first screen. If you replace the form or change the destination URL, create and approve a new code.
Official sources checked
- Google Docs Editors Help: Publish and share your form with responders
- Google Chrome Help: Share pages in Chrome on a computer
- Google Chrome Help: Share pages in Chrome on Android
- Google Chrome Help: Share pages in Chrome on iPhone and iPad
- DENSO WAVE: Point for determining the code area
Read next
- Google Forms + Sheets + Apps Script Operations
- How to Use Google Forms
- How to Make a Booking Form in Google Forms
- How to Export Questions From Google Forms
Disclosure and Verification
This article was checked on August 26, 2026 against Google Help, DENSO WAVE documentation, and the current FORMLOVA specification and implementation. The author is the developer of FORMLOVA. Google Forms labels and Chrome sharing menus may change. Always verify the current responder link and a physical proof before a large print run.
To generate a QR code for a published form in chat, create a free FORMLOVA account.